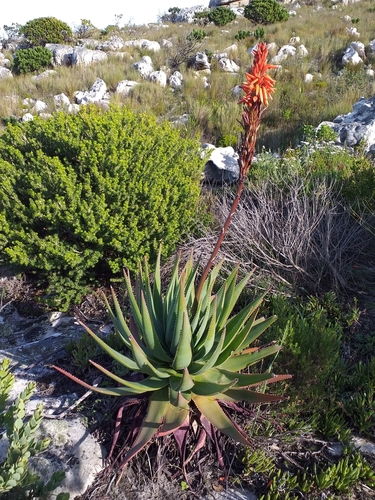
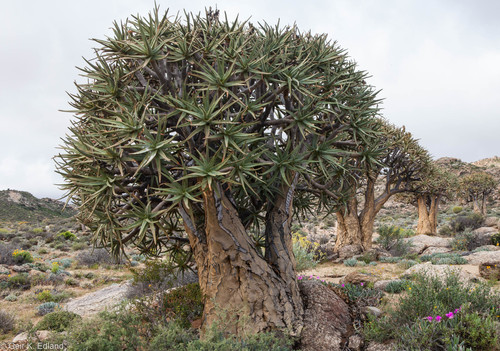
Quiver Tree, Kokerboom
aloe dichotoma
Also known as: ["Quiver Tree","Kokerboom"]
Overview
A distinctive succulent tree native to Southern Africa, known for its striking branching habit and grey bark.
Benefits & Perks
["drought tolerant","aesthetic foliage","wildlife attractant (bees, butterflies, birds)","rare/collector’s item"]
Botanical Classification
| Phylum: | Magnoliophyta |
| Class: | Liliopsida |
| Order: | Asparagales |
| Family: | Asphodelaceae |
| Genus: | Aloe |
| Botanical Name: | Aloe dichotoma |
Plant Characteristics
Basic Information
- Category: Succulents & Cacti
- Suitable Location: outdoor garden in arid or semi-arid regions, or as a potted plant in a sunny, dry location
- Suitable For:
- Is Weed: No
- Allergenicity: low
Environmental Needs
- Climate: {"temperatureRange":"5–40°C"}
- Hardiness: {"zones":"9–11"}
- Misting: rarely required, only if ambient humidity is very low
- Drainage: Fast-draining to prevent waterlogging.
- Soil Type: Well-draining cactus or succulent mix with added perlite or coarse sand.
Maintenance Level
- Maintenance Level: moderate
- Toughness Level: high
- Pruning Frequency: As needed, typically every 1–2 years or when dead growth is noticeable.
- Pruning Intensity: Light to moderate; remove only dead, diseased, or overgrown stems.
Care Details
Ideal Sunlight Coverage:
Bright, direct sunlight for 6–8 hours daily. Tolerates full sun but benefits from partial shade during intense midday summer heat.
Sunlight Tolerance Tips:
Acclimate gradually to intense sunlight to prevent scorching; place in a spot with unobstructed light; move indoors or provide shade during extreme heat.
Care Requirements
Care Difficulty
moderatemoderate
Sunlight
full sun to partial shade
Rotate plant weekly for even growth; avoid sudden light changes; protect from harsh afternoon sun in summer.
Watering
every 4–6 weeks, allowing soil to dry completely between waterings
Water deeply but infrequently; avoid waterlogged soil; water early in the morning to minimize evaporation.
Soil
well-draining, sandy or gravelly soil with minimal organic content
pH: Slightly acidic to neutral (pH 6.0–7.0).
Ensure pots have drainage holes; avoid heavy, water-retentive soils; top-dress with gravel for extra drainage.
Temperature
Prefers warm temperatures (65–85°F or 18–29°C). Tolerates mild frosts but thrives in arid, hot conditions.
Protect from frost; avoid sudden temperature swings; adjust watering with temperature changes.
Fertilizing
rarely required, if at all, use a diluted cactus fertilizer every 6 months during active growth
Fertilize only when actively growing; avoid over-fertilization; flush soil occasionally to prevent salt buildup.
Propagation
Methods
Stem cuttings or offsets (pups).
Step-by-Step Propagation Guide
- Cut a healthy stem or remove an offset.
- Let it callus for a few days.
- Plant in dry soil.
- Water lightly after roots form.
Best Time: Spring or early summer when the plant is actively growing.
Environment
Warm, bright, indirect light; high humidity (e.g., propagation dome) for initial rooting.
Medium
Well-draining mix of cactus soil and perlite or sand.
Hormone
Optional, but rooting hormone can speed up root development.
Timeline
Roots develop in 2–4 weeks; establish in new pot within 2–3 months.
Tools Needed
Sharp knife or shears, rooting hormone (optional), small pots, well-draining soil.
Quick Tips
Allow cuttings to callus before planting; use sterile tools; maintain humidity until roots form.
Pruning & Repotting
Pruning Guide
Method
Cut stems back to the base or desired length, ensuring clean cuts to avoid damage.
Pruning Plan
Minimal pruning; focus on removing dead or damaged stems to maintain shape and health.
Tools
Pruning shears, sterilized knife.
Checklist
Sterilize tools; cut dead/damaged stems; shape as desired; clean up debris.
Repotting Guide
Best Season
Spring, before the active growing season begins.
Pot Size
One size larger pot (e.g., +2–3 cm in diameter).
Method
Remove plant gently; trim any dead roots; place in a slightly larger pot with fresh, well-draining soil; water lightly after repotting.
Suggestions
Repot only when the plant becomes root-bound or outgrows its container, typically every 3–5 years.
Checklist
Choose appropriate pot size; prepare well-draining soil; handle roots carefully; water sparingly post-repotting.
Advanced Care Tips
Watering Mastery
Watering Checklist
Check soil dryness; water deeply; ensure drainage; discard excess water; adjust frequency seasonally.
How to Apply Water Properly
Water directly at the base of the plant, ensuring moisture reaches the root zone without wetting the leaves. Water until it drains from the bottom, then discard excess to prevent root rot.
Watering Schedule Tips
Water sparingly, allowing soil to dry completely between waterings. Reduce frequency in winter to once every 4–6 weeks; increase slightly in summer to every 2–3 weeks, depending on heat and humidity.
Soil Improvement
Add coarse sand, perlite, or pumice to commercial potting mix to enhance drainage and aeration.
Temperature Stress Management
Signs of Temperature Issues
Chlorosis or browning of leaves in excessive heat; shriveled leaves or stem damage in cold stress.
Cold Stress
Low temperatures slow growth and can cause root damage or leaf discoloration, especially below 40°F (4°C).
Solution: Move to a warmer location; insulate with mulch or frost cloth; reduce watering in cold periods.
Hot Stress
Excessive heat can cause leaf scorch, dehydration, or sunburn, especially with inadequate water.
Solution: Provide partial shade during peak heat; increase watering frequency; ensure good air circulation.
Fertilizing Guide
Fertilizing Checklist
Use diluted fertilizer; apply during growing season; avoid winter feeding; flush soil periodically.
Fertilizing Method
Use a balanced, water-soluble fertilizer diluted to half strength every 4–6 weeks during growing season (spring/summer). Avoid fertilizing in fall and winter.
Common Problems & Solutions
Toxicity Warning
Cats
Slightly ToxicSimilar to dogs, cats may experience mild gastrointestinal distress if they ingest parts of Aloe dichotoma. The plant is not considered highly toxic but can cause discomfort.
⚠️ Symptoms:
🌿 Toxic Parts:
⚡ Toxic If:
if eaten
Dogs
Slightly ToxicThe leaves of Aloe dichotoma contain compounds that can cause mild gastrointestinal upset in dogs. While not highly toxic, ingestion may lead to digestive disturbances.
⚠️ Symptoms:
🌿 Toxic Parts:
⚡ Toxic If:
if eaten
Humans
Slightly ToxicAloe dichotoma contains anthraquinone compounds, which can act as laxatives and may cause gastrointestinal irritation when ingested in significant quantities. The plant's sap is generally not considered highly toxic but can lead to mild discomfort.
⚠️ Symptoms:
🌿 Toxic Parts:
⚡ Toxic If:
if eaten
Frequently Asked Questions
Q: Is Aloe dichotoma suitable for indoor cultivation?
A: No, it is best suited for outdoor cultivation in warm, arid climates due to its size and light requirements.
Q: How often should Aloe dichotoma be watered?
A: Water sparingly, allowing the soil to dry completely between waterings, especially during winter.
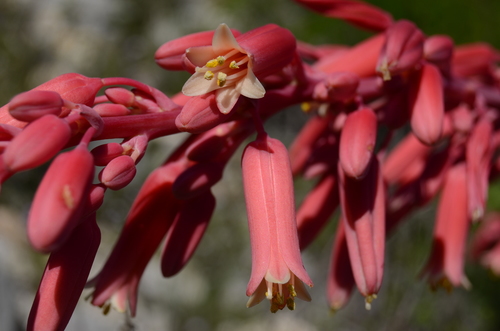
Q: Does Aloe dichotoma produce flowers?
A: Yes, it produces bright yellow flowers, typically in winter, which attract pollinators.
Quick Reference
| Family: | Asphodelaceae |
| Care: | moderate |
| Light: | full sun to partial shade |
| Water: | every 4–6 weeks, allowing so |
Get Expert Care Tips
Download the Plantious app for personalized care reminders and plant identification!
Google Play App Store